Third-party integrations
Third-party integration from Scrutinizer can be enabled by navigating to Admin > Definitions > 3rd Party Integration. Select an integration in the dropdown menu and enter the integration URL of the desired integration server in the URL box. Uncheck the disable checkbox, otherwise the integration will not be visible in the Device Explorer.
Some integrations, such as PRTG and Solarwinds, require object ID translations. Please review the setup instructions if these types of integrations are going to be enabled.
PRTG integration
PRTG integration can be enabled from the Admin > Definitions > 3rd Party Integration menu. Additional fields are required to connect to the PRTG API.
- Select PRTG in the dropdown menu.
- Uncheck the ‘disabled’ checkbox.
- Fill out the additional fields that appear:
Field Description Protocol The default is https, but http can be entered if PRTG is set up to use it IP The IP address of the PRTG server Port The default is 443, but another port can be entered if PRTG is configured to use it User The login user to connect to PRTG API Password The login users password to connect to PRTG API
- Click the Save button.
Note
Defaulted fields assume that the PRTG instance is running on HTTPS. If the local install is running on a different port or using a different protocol the settings can be adjusted to match what is configured on the PRTG server (PRTG Administration Tool > Web Server Tab)
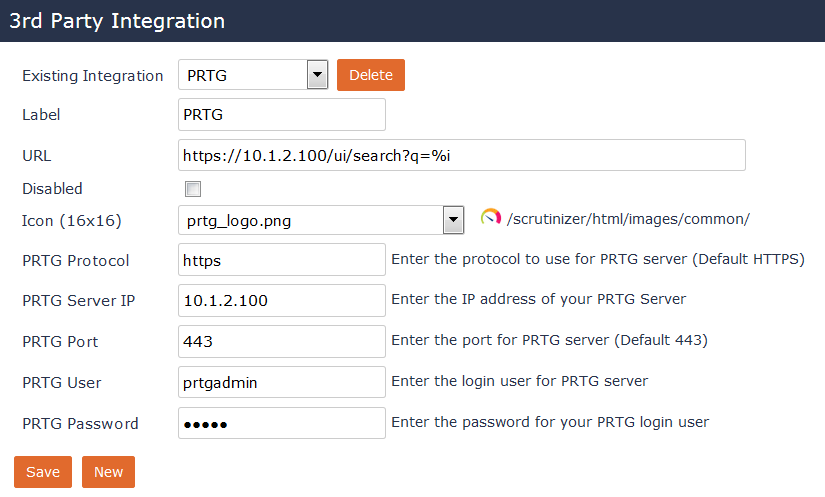
Now that the PRTG third-party integration is enabled, its icon will be displayed in the Device Tree for each exporter on the Status Tab and the Maps tab. By clicking on the PRTG icon, a browser is launched. PRTG will then display the device statistics for the exporter selected in Scrutinizer.
Solarwinds integration
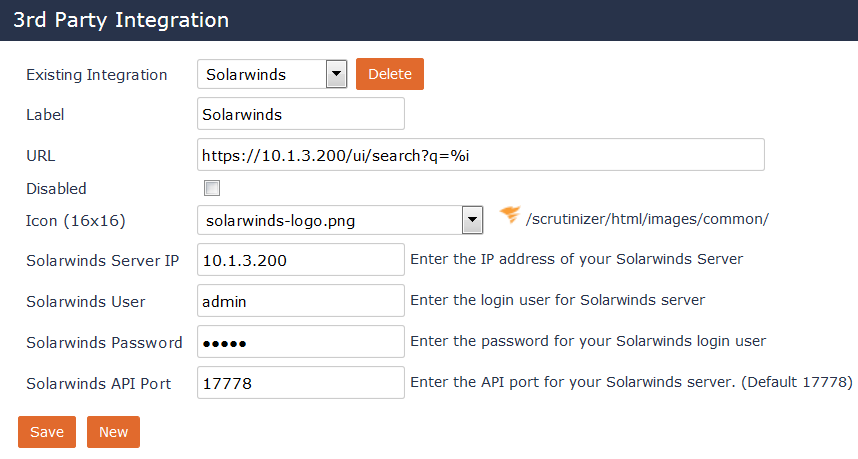
The Solarwinds integration can be enabled from the ** Admin > Definitions > 3rd Party Integration** menu. Additional fields are required to connect to the Solarwinds API.
- Select Solarwinds in the dropdown menu.
- Uncheck the ‘disabled’ checkbox.
- Fill out the additional fields that appear:
Field Description IP The IP address of the Solarwinds server User The login user to connect to Solarwinds API Password The login users password to connect to Solarwinds API Port The default is 17778, but another port can be entered if Solarwinds is configured to use it
- Click the Save button.
Warning
Please be aware that Solarwinds includes the user ID and password in plain text in the URL. Using HTTPS will protect the integrity of the credentials over the network, but they will still be visible in the URL, per process set by Solarwinds.
Now that the Solarwinds third-party integration is enabled, its icon will be displayed in the Device Tree for each exporter on the Status and Maps tab. Clicking on the Solarwinds icon will launch a browser. Solarwinds will then display the device statistics for the exporter selected in Scrutinizer.
Solarwinds Integration into Scrutinizer
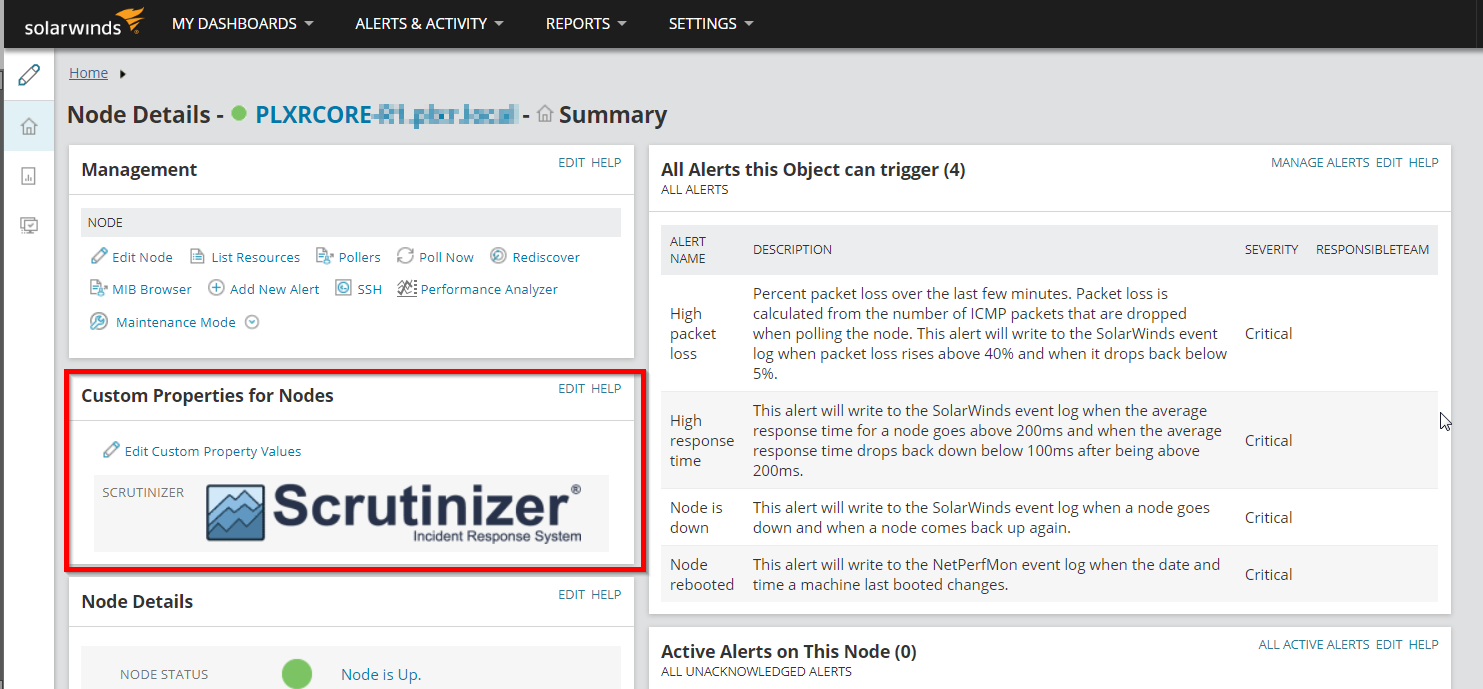
You can also pivot from the Node Details page in Solarwinds NPM into a Scrutinizer report by following these steps:
Note
This integration was written with Solarwinds NPM 12.2. It is not guaranteed to work on older installations.
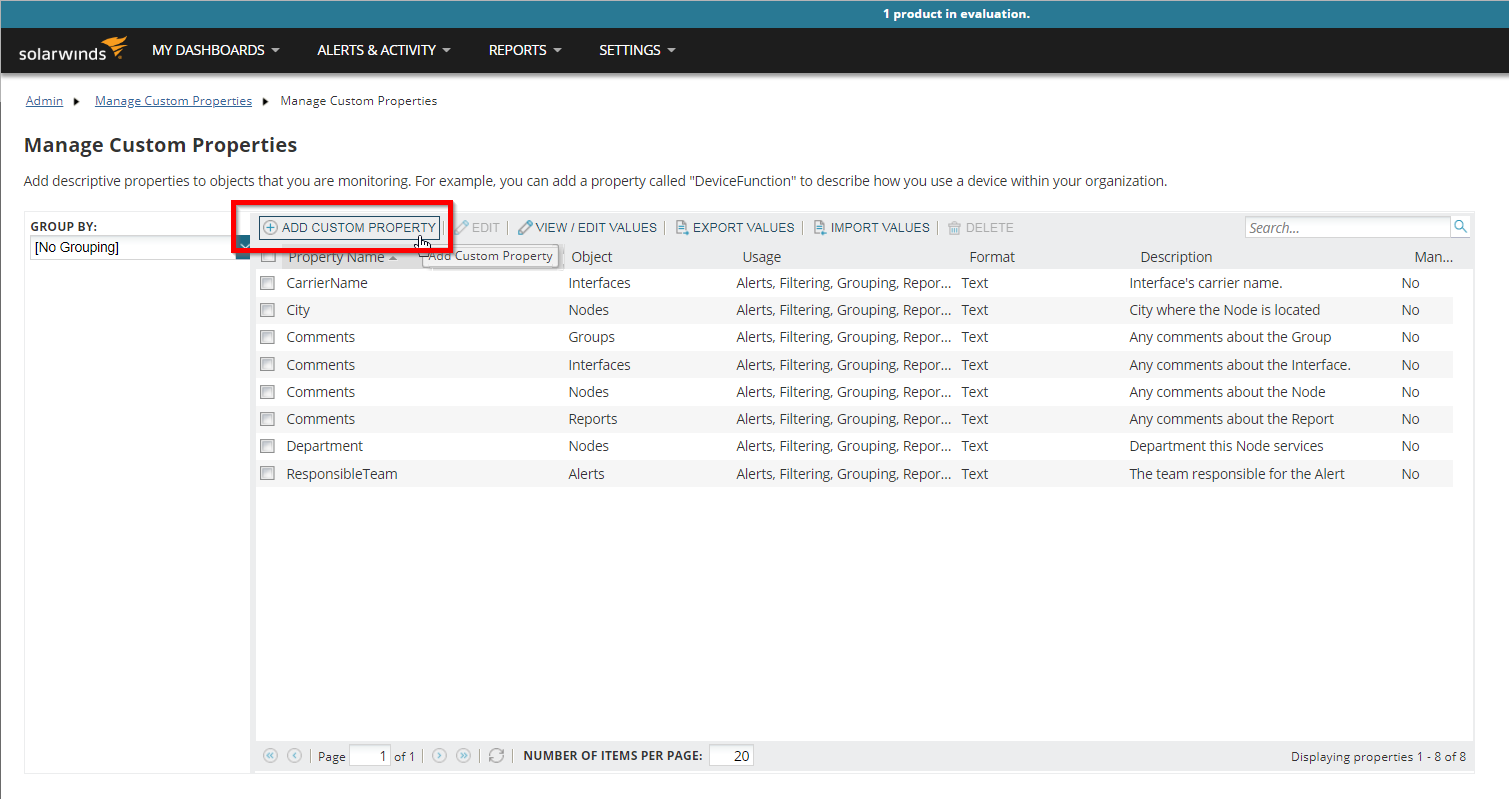
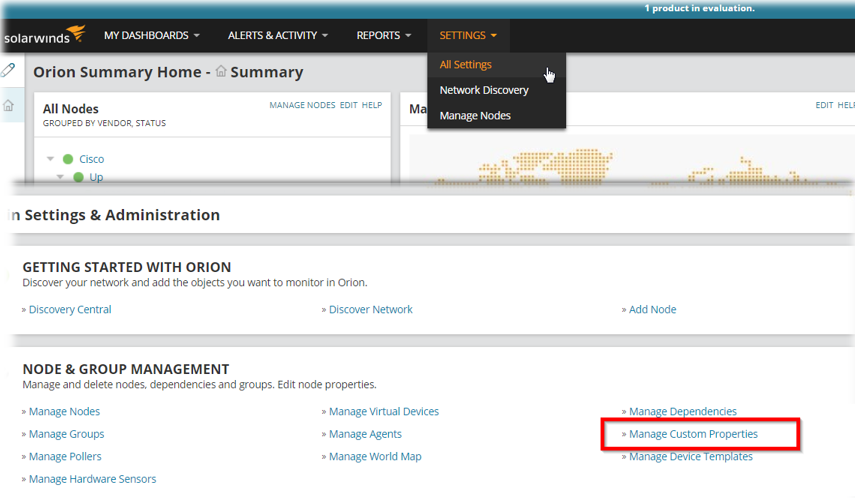
Navigate to Settings > All Settings. Under the section Node & Group Management, choose Manage Custom Properties.
Click Add Custom Property. Select Nodes from the dropdown list:
- Fill out the name and description fields for the property (eg. Scrutinizer).
- Click Next.
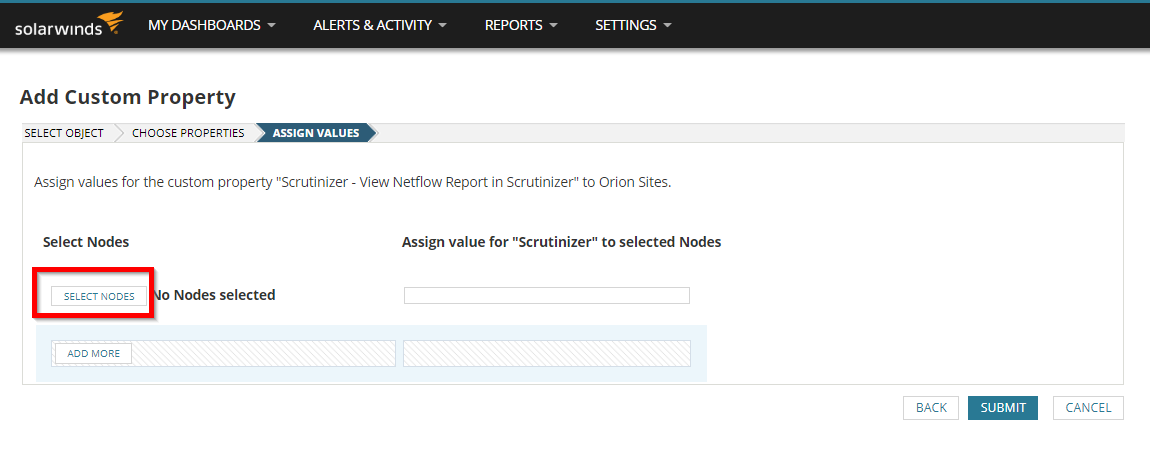
- Now to assign this property to your existing nodes
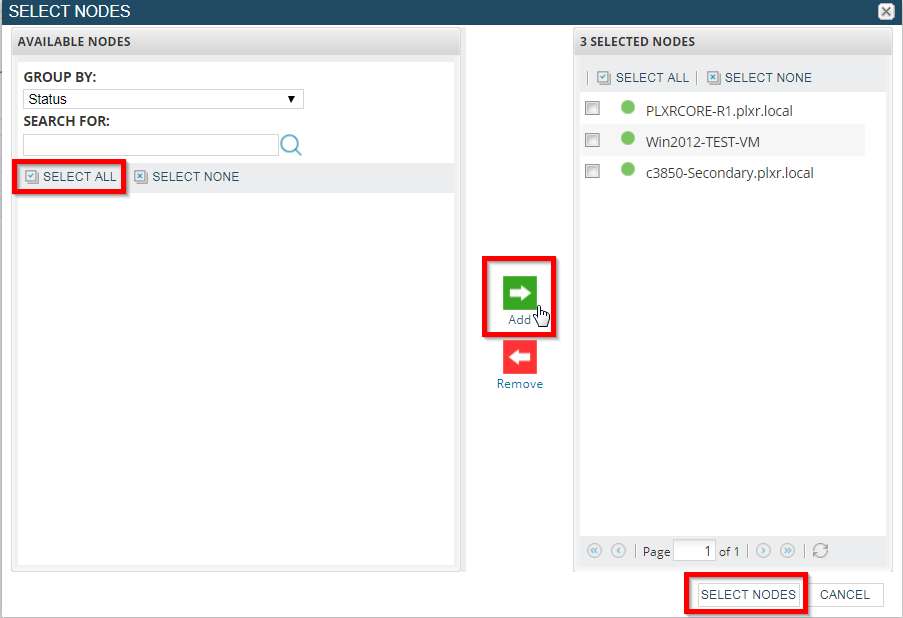
- Click the button labeled Select Nodes to specify your exporters. You may select all or just a few.
- Use the Add arrow to move your selected exporters.
- Choose Select Nodes when you are finished.
- Now to add the value for all these nodes. This is where we specify the Scrutinizer info.
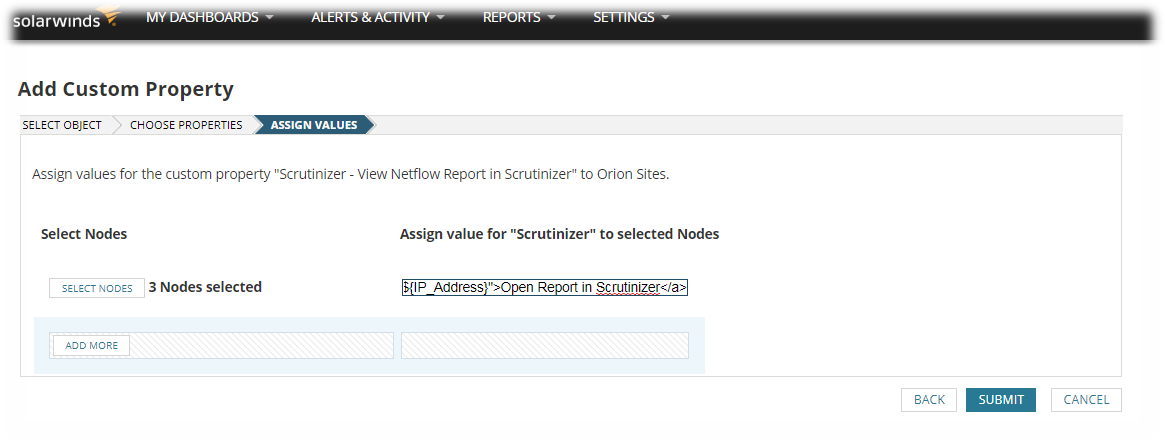
- Fill in the value box with the following code:
<a href="http://SCRUTINIZER_IP_ADDRESS/search.html?el=${IP_Address}&reportType=conversations">
        <img src="https://cdn.plixer.com/wp-content/uploads/2016/09/scrutinizer_logo-300x49.png" height="49" width="300"></img>
</a>
Tip
You can specify the default report type that opens in Scrutinizer by editing the code block in step 4. To specify another report type by the API report name
for example, “Conversations WKP” is known as conversations you just need to replace the reportType field in the url.
- Specify the IP address of your server in the above URL where it says SCRUTINIZER_IP_ADDRESS.
- Click Submit.
You will now have a custom properties widget on your node details page for all your selected hosts. Clicking the Scrutinizer logo will open a report in Scrutinizer.
