

Scrutinizer#
Scrutinizer virtual appliances can be deployed in local hypervisors, Amazon Web Services (as an AMI via the AWS Marketplace), Google Cloud Platform, Microsoft Azure, or Oracle Cloud Infrastructure. Hardware appliances are also available upon request.
Contact Plixer Technical Support or a local reseller for availability and licensing or visit www.plixer.com to learn more.
Note
Scrutinizer virtual appliance packages are also available for download from the Plixer Customer Portal.
On this page:
Sizing#
See the sizing guidelines/recommendations below for guidance when deploying a new Scrutinizer server or updating resource allocations.
Note
Certain steps below will require access to the Scrutinizer web interface and are intended for verification and/or further sizing adjustments after initial deployment.
Trial or temporary deployments can be provisioned with the following minimum requirements:
12 CPU cores, 20+ GHz
16 GB RAM
100 GB disk
CPU/RAM#
Follow these steps to determine the total number of CPU cores and amount of RAM that will be required by a Scrutinizer deployment:
View instructions
Determine CPU and RAM requirements for flow collection, reporting, and core alarm policies based on expected flow rate and exporter count:
CPU cores and RAM based on flow rate and exporter count
Exporters
F/s
5
25
50
100
200
300
400
500
5k
8 CPU 16 GB
8 CPU 16 GB
10 CPU 20 GB
14 CPU 28 GB
20 CPU 39 GB
26 CPU 52 GB
32 CPU 67 GB
38 CPU 82 GB
10k
8 CPU 16 GB
8 CPU 16 GB
12 CPU 24 GB
18 CPU 36 GB
25 CPU 50 GB
32 CPU 65 GB
38 CPU 81 GB
43 CPU 97 GB
20k
16 CPU 32 GB
16 CPU 32 GB
16 CPU 32 GB
24 CPU 48 GB
32 CPU 64 GB
38 CPU 80 GB
43 CPU 96 GB
48 CPU 112 GB
50k
32 CPU 64 GB
32 CPU 64 GB
32 CPU 64 GB
32 CPU 64 GB
39 CPU 80 GB
44 CPU 96 GB
48 CPU 112 GB
52 CPU 128 GB
75k
46 CPU 96 GB
46 CPU 96 GB
46 CPU 96 GB
46 CPU 96 GB
46 CPU 96 GB
49 CPU 112 GB
52 CPU 128 GB
55 CPU 144 GB
100k
52 CPU 128 GB
52 CPU 128 GB
52 CPU 128 GB
52 CPU 128 GB
52 CPU 128 GB
52 CPU 128 GB
55 CPU 144 GB
58 CPU 160 GB
125k
58 CPU 160 GB
58 CPU 160 GB
58 CPU 160 GB
58 CPU 160 GB
58 CPU 160 GB
58 CPU 160 GB
58 CPU 160 GB
61 CPU 176 GB
150k
64 CPU 192 GB
64 CPU 192 GB
64 CPU 192 GB
64 CPU 192 GB
64 CPU 192 GB
64 CPU 192 GB
64 CPU 192 GB
64 CPU 192 GB
Determine additional CPU and RAM requirements to support the feature sets that will be enabled:
Note
Each FA algorithm reports detections using one or more alarm policies, which are also enabled/disabled as part of the feature set. Policy-to-algorithm associations can be viewed in the Admin > Alarm Monitor > Alarm Policies view.
The CPU and RAM allocations per feature are recommended for deployments with up to 500 exporters and a total flow rate of 150,000 flows/s.
Feature resource requirements and FA algorithms
Feature
CPU
RAM
FA Algorithms
Streaming (to a Plixer ML Engine or external data lake)
1 cores
0.4 GB
N/A
Basic Tuple Analysis
5.85 cores
3.3 GB
DNS Hits
FIN Scan
Host Reputation
ICMP Destination Unreachable
ICMP Port Unreachable
Large Ping
Odd TCP Flags Scan
P2P Detection
Packet Flood
Ping Flood
Ping Scan
Reverse SSH Shell
RST/ACK Detection
SYN Scan
TCP Scan
Network Transports
UDP Scan
XMAS Scan
Application Analysis
0.25 cores
0.1 GB
Protocol Misdirection
Worm Analysis
0.5 cores
0.2 GB
Lateral Movement Attempt
Lateral Movement
FlowPro DNS Exfiltration Analysis
0.5 cores
0.2 GB
DNS Command and Control Detection
DNS Data Leak Detection
FlowPro DNS Basic Analysis
0.25
0.1 GB
BotNet Detection
JA3 Analysis
0.25
0.1 GB
JA3 Fingerprinting
FlowPro DNS Server Analysis
0.25 cores
0.1 GB
DNS Server Detection
FlowPro Domain Reputation Analysis
0.25 cores
0.1 GB
Domain Reputation
Firewall Event Analysis
0.25 cores
0.1 GB
Denied Flows Firewall
Scan Analysis
1.0 cores
0.4 GB
Bogon Traffic
Breach Attempt Detection
NULL Scan
Source Equals Destination
Jitter Analysis
0.25 cores
0.1 GB
Medianet Jitter Violations
DNS Lookup Analysis
0.25 cores
0.1 GB
NetFlow Domain Reputation
DoS Analysis
0.5 cores
0.2 GB
DDoS Detection
DRDoS Detection
Host Index Analysis
2.4 cores
2.4 GB
Host Watchlist
Incident Correlation
IP Address Violations
Provision the Scrutinizer appliance with the CPU and RAM totals obtained from steps 1 and 2.
In the web interface, navigate to Admin > Resources > System Performance and verify that the correct CPU core count and RAM amount are displayed for the collector.
After confirming that CPU and RAM allocations have been correctly applied, go to Admin > Resources > System Performance > Feature Resources and enable/disable features according to the selections made for step 2.
Once Scrutinizer is fully configured and running, CPU and RAM utilization can be monitored from the Admin > Resources > System Performance page using the CPU Utilization and Available Memory graphs. These graphs should be reviewed regularly (in addition to after resources are initially allocated), so that any necessary adjustments can be made.
Important
After making any adjustments to Scrutinizer’s resource allocations, launch scrut_util as the root user and run the set tuning command to re-tune the appliance.
Note
Events related to resource utilization (e.g. collection paused/resumed, feature set paused/resumed, etc.) are reported under the System category of alarm policies.
Additional resources may also be required to support large numbers of notification profiles, report thresholds, and/or scheduled email reports.
Storage#
The Admin > Resources > System Performance page of the web interface summarizes disk utilization for individual collectors in a Scrutinizer environment. A more detailed view that shows actual and expected storage use for historical flow data can also be accessed by drilling into a specific collector.
Described below are the main factors that influence a Scrutinizer collector’s disk utilization and recommendations for anticipating additional storage needs.
Data retention#
Scrutinizer’s data history settings can be used to adjust how long Scrutinizer stores aggregated flow data, alarm/event details, and other data. With the default settings, a collector provisioned with the minimum 100 GB of storage can store up to 30 days of NetFlow V5 data for a maximum of 25 flow-exporting devices with a combined flow rate of 1,500 flows/s.
For expected disk space utilization based on specified data retention settings, the following database size calculator can be accessed from the Admin > Settings > Data History > Flows tray:
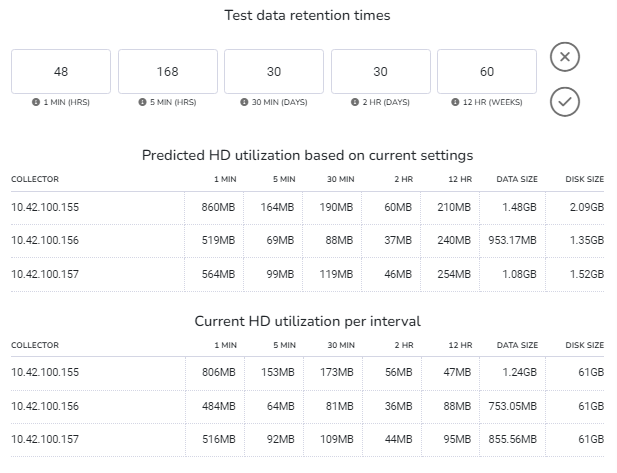
The calculator shows both current and predicted disk usage for each historical flow data interval based on the retention times entered. Details are shown by collector, with total predicted usage and total storage currently available also included.
Note
More detailed storage utilization information can be accessed by drilling into a collector from the Admin > Resources > System Performance page.
Scrutinizer’s functions are highly I/O intensive, and there are many factors that can impact the system’s disk-based performance, such as the size/complexity of flows being received and flow cardinality. To ensure optimal performance, 15k HDDs or SSDs in a RAID 10 are recommended.
Data aggregation#
Scrutinizer’s SAF (Summary and Forensic) data aggregation method is an optimized system of storing flow data that makes use of summary tables to condense collected information without compromising transparency or accuracy.
Show details
How SAF works
With SAF, any incoming flow template with the required data elements is aggregated into a new template definition based on a tuple that includes commonPort. The resulting “summarized” template will omit all data elements that prevent aggregation (e.g., source and destination transport ports) but still contain all information required for the vast majority of reporting needs.
Tip
The aggregation logic used to create summary tables can be modified to suit different scenarios. Contact Plixer Technical Support for assistance.
The data elements retained in the summary tables include but are not limited to:
intervalTimecommonPortingressInterfaceegressInterfacesourceIpAddressdestinationIpAddressoctetDeltaCountoctetDeltaCount_revpacketDeltaCountpacketDeltaCount_revflowDirectionapplicationIdprotocolIdentifier
Once five 1m summary tables are available, the data averages for the top 1000 (default) conversations are rolled up into 5m tables, and the system continues the rollups to create 30m, 2h, and 12h tables.
Benefits of SAF aggregation
Because the summary tables created under SAF aggregation are drastically smaller in size than regular full-template tables, they benefit the Scrutinizer system in the following ways:
Reduced disk utilization per table
Increased historical data capacity
Improved report render times
Faster lookups before drilling into forensic data
While only summary data is rolled up into higher interval tables, Scrutinizer still retains the original forensic data, which is used by a handful of reports that require data elements not included in the summary tables. At the same time, the system also maintains a separate totals table for in/out byte counts per interface to allow for accurate utilization reporting without relying on SNMP.
Notes on collecting sFlow
When collecting sFlow, packet samples and interface counters should both be forwarded to the collector. Packet samples will be saved to the raw tables, and interface counters will be saved to the totals tables at one-minute intervals.
Important
Having an sFlow exporter (e.g., switch) that sends multiple templates for different flows may result in overreporting, if the flows contain the same or very similar information. Scrutinizer’s frontend will run reports using data from all templates that match the information. To avoid this, use filters to specify a single template.
Auto-trimming#
Scrutinizer automatically trims older historical flow data when available disk space falls below the Minimum Percent Free Disk Space Before Trimming value configured in the data history settings.
Auto-trimming can be disabled by unticking the Auto History Trimming checkbox, but flow collection and other functions may be paused when available storage runs low. The amount of storage for the collector can also be increased to retain older records.
Host indexing#
When host indexing is enabled, it may become necessary to allocate additional CPU cores, RAM, and disk space to Scrutinizer collectors.
Host to host indexing can have a significant impact on disk utilization due to the two types of records stored:
Continuously active pairs, for which records will not expire
Ephemeral unique pairs, for which records will expire but are also replaced at approximately the same rate
Storage requirements#
To approximate the amount of additional disk space that will be used by the host to host index:
Create/run a new Host to Host pair report and add all exporters that were defined as inclusions for the Host Indexing FA algorithm.
Set the time window to cover a period of at least 24 hours.
When the output of the report is displayed, click the gear button to open the Options tray and select Global.
In the secondary tray, select the 5m option from the Data Source dropdown and click Apply before returning to the main view.
Note the total result count, which will be roughly equivalent to the number of active pairs.
Return to the Options > Global tray and switch to the 1m data source option.
Subtract the previous result count from the updated total result count to determine the number of ephemeral pairs.
After obtaining the active pair and ephemeral pair counts, the following formula can be used to calculate additional disk space requirements for host to host indexing:
(Active pair count + Ephemeral pair count) * Exporter count * 200 B
where Exporter count corresponds to the total number of exporters/inclusions defined for the Host Indexing algorithm.
Utilization alerts#
If the combined disk space used by the host and host pair databases reaches 100% of the Host Index Max Disk Space setting of the Host Indexing algorithm, host and host to host indexing will be suspended until storage becomes available again.
The following alarm policies are used to alert users to high disk utilization by host indexing:
Policy |
Description |
|---|---|
Host Index Disk Space Warning |
Triggered when the disk space used by host indexing functions reaches/exceeds 75% of the specified Host Index Max Disk Space |
Host Index Disk Space Error |
Triggered when host indexing functions are suspended because the Host Index Max Disk Space has been reached |
Host Index Disk Availability Error |
Triggered when host indexing functions are suspended because disk utilization for the volume the host and host pair databases are stored on has reached/exceeded 90% |
Host indexing functions will automatically restart once sufficient storage is available, either due to record expiry or because disk space has been added.
Distributed clusters#
Distributed clusters consisting of one primary reporting server and multiple remote collectors allow Scrutinizer to scale beyond the single-appliance ceiling of 500 exporters with a total flow rate of 150,000 flows/s.
Remote collectors#
Resource allocation for each remote collector in a distributed cluster should follow the same guidelines/recommendations as that of a single Scrutinizer appliance:
Use the expected flow rate and exporter count for the collector to determine recommended CPU and RAM allocations for core functions.
Calculate the total additional CPU cores and RAM required to support the features that will be enabled for the collector and exporters associated with it.
Provision the collector with the minimum 100 GB of disk space and the total CPU and RAM obtained from the first two steps.
After the collector has been registered as part of the cluster and is receiving flows, continue to monitor resource utilization via the Admin > Resources > System Performance page and make adjustments when necessary.
Primary reporter#
The primary reporter in a distributed environment requires the following additional resources (on top of the base resource requirements) based on the number of remote collectors in the cluster:
Resource |
Minimum |
Recommended |
|---|---|---|
CPU cores |
2x the number of remote collectors |
4x the number of remote collectors |
RAM |
2 GB for every remote collector |
4 GB for every remote collector |
Note
Primary reporters that are receiving extremely high volumes of alarm/event data from collectors may require specialized resourcing. Contact Plixer Technical Support for assistance.
Virtual appliance deployment#
Component |
Minimum (for trial installations) |
Recommended (for production environments) |
|---|---|---|
Memory |
16 GB |
24 GB |
Storage |
100 GB |
1+ TB 15K RAID 0 or 10 configuration |
Processor |
8 CPU cores, 2.0+ GHz |
12 CPU cores, 2.0+ GHz |
Note
In clustered virtual environments, assign a static MAC address to the Scrutinizer NIC to avoid license key issues.
Disk sizes can be expanded to support higher flow rates after deployment. A dedicated 15k RPM RAID 10 datastore is recommended for optimal performance.
See this guide for further sizing recommendations.
Local Hypervisors#
ESXi
Additional requirements:
ESXi 6.7 U2+
VMware vSphere or vCenter
Deploying the OVF template
Log in to the Plixer Customer Portal or use the link provided by Plixer Technical Support to download the latest VMware virtual appliance package.
Extract the contents of the package to a location on the ESXi server.
In vSphere or vCenter, deploy the appliance on a host using the OVF template option (this will require the OVF and VMDK files).
Select Thick Provision for the datastore disk format.
After selecting the network to be used by the virtual appliance, verify the configuration in the summary before starting the import operation.
After the template has been successfully imported (may take several minutes), assign a static MAC address to the Scrutinizer NIC for licensing purposes.
Power on the VM.
After the Scrutinizer virtual appliance completes booting, proceed with the initial appliance setup.
Note
To upgrade the virtual machine’s hardware version to the latest ESXi version, select Compatibility > Upgrade VM Compatibility in vSphere or vCenter while the VM is powered off. When the VM is powered back on after the upgrade, it will boot up with the latest ESXi hardware version available.
Expanding database size
To allocate additional storage to the Scrutinizer database, follow these steps:
View instructions
Power off the Scrutinizer VM.
Add a new hard disk to the device.
Select the type of disk provisioning based on these recommendations.
Confirm to add the new disk.
Once the new disk has been added, power on the VM and follow this guide to make it available to Scrutinizer.
Hyper-V
Additional requirements:
Generation 2 Hyper-V VM
Hyper-V 2012
Hyper-V Manager
Deploying the Hyper-V virtual appliance
Log in to the Plixer Customer Portal or use the link provided by Plixer Technical Support to download the latest Hyper-V virtual appliance package.
Extract the contents of the package to a location on the Hyper-V server.
In Hyper-V Manager, select the option to import a VM, and then select the Scrutinizer Hyper-V image.
After the image has been imported, provision the Scrutinizer VM based on the recommended sizing for the expected flow rate.
Select a network adapter and assign it to the appropriate virtual switch.
Assign a static MAC address to the VM.
Save the updated settings, and then start the VM.
After the Scrutinizer virtual appliance completes booting, connect to the VM and then proceed with the initial appliance setup.
Expanding database size
Depending on the volume of NetFlow data that will be forwarded to the Scrutinizer virtual appliance, it may be necessary to allocate additional storage space for its database.
To add a hard drive to the Scrutinizer virtual machine, follow these steps:
Power off the Scrutinizer VM.
In Hyper-V Manager, select the option to add a new virtual hard drive in the VM’s settings.
Select VHDX as the disk format (supports expansion past 2 TB).
Configure the other disk settings as needed.
Once the new drive has been added, power the VM on and follow this guide to make it available to Scrutinizer.
KVM
Additional requirements:
KVM 16 or higher
Deploying the KVM virtual appliance
Log in to the Plixer Customer Portal or use the link provided by Plixer Technical Support to download the latest KVM virtual appliance package.
Create a directory for the install:
mkdir /kvm/scrutinizer_vm/Extract the contents of the package to the new directory:
sudo tar xvzf PACKAGE_FILENAME.tar.gz -C /kvm/scrutinizer_vm/Run the installation script in the new directory:
cd /kvm/scrutinizer_vm/PACKAGE_FILENAME
sudo ./install-kvm-scrut.sh
Wait for the confirmation that the virtual machine has been created from the image.
After the VM starts up, access the console using virsh console <VM_DOMAIN_OR_ID> to proceed with the initial appliance setup.
Nutanix
Deploying the virtual appliance in Nutanix
Log in to the Plixer Customer Portal or use the link provided by Plixer Technical Support to download the latest qcow2 image file.
Log in to Prism Element and upload the image (as a disk) to any storage container (except SelfServiceContainer).
After the image becomes active, create a new VM with the following configuration:
Resources: Recommended sizing (minimum of 8 cores and 16 GB RAM, fewer CPUs with more cores is recommended)
Boot configuration: UEFI
Operation: Clone from image
Bus type: SATA (SCSI is not recommended due to known issues with Red Hat 9 systems)
Image: Image/disk uploaded in step 3
Index: Next available
Add a new NIC to the VM and assign it to the desired subnet.
Save the VM configuration, and then power on the VM.
After the Scrutinizer virtual appliance completes booting, launch the console to proceed with the initial appliance setup.
Proxmox
Note
When attaching the imported disk (step 4), verify that its name matches what’s displayed in the GUI.
The syntax in the instructions below should be modified to match the actual VMID and disk names/numbers used.
Deploying the virtual appliance in Proxmox
Log in to the Plixer Customer Portal or use the link provided by Plixer Technical Support to download the latest qcow2 disk file (or the KVM image, which includes the qcow2 disk).
Create a new virtual machine in Proxmox with the following configuration:
BIOS: OVMF (UEFI)
SCSI controller: VMware PVSCSI
Network adapter: E1000
CPU/memory: Recommended sizing
Add a new EFI disk with default sizing
Import the disk via the CLI:
qm importdisk VMID /var/lib/vz/template/Plixer_Scrutinizer.qcow2 PROXMOX_CONTAINER_NAMEExample:
qm importdisk 100 /var/lib/vz/template/Plixer_Scrutinizer.qcow2 local-zfsAttach the imported disk to the virtual machine:
qm set VMID -scsi0 local-zfs:VM_DISK_NAME
Example:
qm set 100 -scsi0 local-zfs:vm-101-disk-1.raw
Remove/delete the unused disk (the default disk created when the VM was added in Proxmox).
Start the VM.
After the VM starts up, access the console to proceed with the initial appliance setup.
Cloud platforms#
Amazon Web Services AMI
Deploying the Scrutinizer AMI
After subscribing to the service via the AWS Marketplace product page, deploy the Scrutinizer AMI by creating/launching a new EC2 instance with the following configuration:
Names and tags: Configure the name, resource types, and optional tags for the instance.
Application and OS images: Select the Scrutinizer AMI from the My AMIs tab.
Instance type: Select C5.2xlarge for flow rates up to 10,000 flows per second (contact Plixer Technical Support for assistance if the expected flow volume exceeds that).
Key pair: Select or create a new key pair to assign to the instance.
Network settings: Select the VPC, subnet, and security group to assign the instance to.
Important
Because an active instance’s primary private IP address cannot be released, we recommend deploying the AMI with two NICs and using the secondary as the collection interface.
Storage: Leave the size of the root volume (
/dev/xvda/) at the default 100 GB.Advanced details: Set Shutdown behavior to Stop and Termination protection to Enabled.
After the instance has been launched, access the Scrutinizer web interface via the instance’s primary private or public IP address, and then proceed to add a license.
Note
For AMI deployments, the default password for the web interface
adminuser is the AWS instance ID of the Scrutinizer instance, which can be copied from the Instance Summary view of the EC2 interface.Use the following command to SSH to the server as the
plixeruser after the instance has been launched:ssh -i PATH_TO_KEY/key.pem plixer@SCRUTINIZER_IP
Expanding database size
To expand the database size for a Scrutinizer AMI, create one or more additional EBS volumes in the same availability zone and attach them to the instance.
These volumes can then be made available to Scrutinizer by following this guide.
Note
set partitions (step 6 in the guide) will need to be run from the scrut_util prompt for each additional drive attached to the instance:
SCRUTINIZER> set partitions <NEW_PARTITION>
Changing instance types
Follow these steps to change the Scrutinizer instance type to increase CPU and RAM allocations:
SSH to the instance as the
plixeruser and stop all services via scrut_util:SCRUTINIZER> services all stopPower off the OS:
shutdown -h nowStop the instance. If an Elastic IP was assigned, note the instance ID and Elastic IP address beforehand.
Change the instance type and restart the instance following this guide.
Verify that a new public DNS (IPv4), Private DNS, and Private IPs have been assigned. The Elastic IP address should also be re-assigned to the instance ID if necessary.
After the instance has been reconfigured, SSH to the Scrutinizer IP address as the plixer user and run the following scrut_util command to re-tune the system:
SCRUTINIZER> set tuning
Google Cloud Platform
Additional requirements:
A GCP project with Billing, Compute Engine, and Migrate to Virtual Machines enabled
Permissions to create Compute Engine images, Compute Engine VM instances, and Cloud Storage buckets (if not using an existing bucket)
A cloud storage bucket on the region intended for the VM (for staging the image)
Importing and deploying the Scrutinizer VM
Log in to the Plixer Customer Portal or use the link provided by Plixer Technical Support to download the latest VMware virtual appliance OVA package.
Upload the image to the staging bucket.
Select the option to import a machine image and use the following settings:
Source: Cloud Storage
File: Select the uploaded OVA
Operating system: RHEL 9
This operation will create a reusable custom image and may take up to 15 minutes. The image must be successfully imported before the Scrutinizer VM can be created.
Create a new VM instance with the machine type most closely matching the recommended resources for the expected flow volume (n4 or c4 recommended).
Configure the OS and storage settings for the VM as follows:
Boot disk: The imported Scrutinizer image
Disk type: Hyperdisk Balanced (required for C4/N4 machine types)
Disk size: Adjust to match storage requirements (minimum of 100 GB)
Configure the networking settings for the VM as follows
Assign an external IPv4 address (ephemeral).
Enable HTTPS traffic through the firewall.
Add a network tag: scrutinizer-https.
Assign a hostname (optional but recommended).
Verify that all settings were configured correctly, and then create/launch the VM.
After the instance has been launched, connect to the VM via serial console (see below if not already enabled for the project) to proceed with the initial appliance setup.
Enabling serial console access
Serial console access (project-level setting) can be enabled for first boot validation and troubleshooting.
In the GCP console, edit the metadata settings for the Compute Engine to add the following:
Key:
serial-port-enableValue:
true
The option to connect to the Scrutinizer VM via serial console will become available after the new key is saved.
Expanding database size
To expand the database size for a Scrutinizer appliance deployed on GCP, first add a new disk via the GCP console:
Note
A new disk can be added while the VM is running.
Select the option to edit the Scrutinizer VM in the GCP console.
Add a new disk with the following configuration.
Disk type: Select the same type as the boot disk.
Disk size: As needed
Save/create the new disk.
After the new disk has been added, follow this guide to make it available to Scrutinizer.
Microsoft Azure
Additional requirements:
A Windows 10+ or Windows Server host with Internet access, at least 200 GB free disk space, and Hyper-V installed
Administrator permissions (including PowerShell commands) on the Windows host
Administrator credentials for the Azure account the Scrutinizer virtual appliance will be deployed on
Uploading and deploying the Scrutinizer VM
Important
Replace the file paths in step 3 and 6 below with the correct paths to the downloaded and converted files in your environment.
Log in to the Plixer Customer Portal or use the link provided by Plixer Technical Support to download the latest Hyper-V virtual appliance package on the Windows host.
Extract the VHD (
Scrutinizer.vhdx) from the file.Start a PowerShell session on the Windows host, and then convert the disk image to fixed size in Powershell:
Convert-VHD -Path 'C:\Users\User Name\Downloads\Scrut-hyperv\Scrutinizer_Hyper-V\Virtual Hard Disks\Scrutinizer.vhdx' -Destination 'C:\tmp\Scrutinizer.vhd' -VHDType Fixed
Install the Az PowerShell module:
Install-Module -Name AzAuthenticate the Windows PowerShell session with the Azure account to be used for deployment:
Connect-AzAccountNote
If the connection fails after the correct Azure credentials are entered, run the following:
Set-ExecutionPolicy RemoteSignedUpload the Scrutinizer VHD to Azure as a managed disk (replace
RESOURCE_GROUP,AZURE_REGION, andDISK_NAMEbelow with the correct details):Add-AzVhd -LocalFilePath 'C:\tmp\Scrutinizer.vhd' -ResourceGroupName RESOURCE_GROUP -Location AZURE_REGION -DiskName DISK_NAME -DiskHyperVGeneration V2 -DiskOsType Linux
After the Scrutinizer VHD has been uploaded, deploy a new VM using the disk image from the Azure portal (note the IP address assigned to the VM as this will be required when setting up the appliance).
Launch/start the VM.
After the Scrutinizer VM completes booting, SSH to the IP address assigned as the plixer user to proceed with the initial appliance setup.
Oracle Cloud Infrastructure
Additional requirements:
A cloud storage bucket (for staging the image)
Gateway and netmask of the OCI VNC subnet that Scrutinizer will be deployed on
Importing and deploying the Scrutinizer VM
Log in to the Plixer Customer Portal or use the link provided by Plixer Technical Support to download the latest VMware virtual appliance package.
If necessary, extract the OVA (
Scrutinizer_Vmware_19.8.0-bios.ova) from the file.Upload the image to the storage bucket.
Create a new custom image by importing the uploaded file from the storage bucket with the following settings:
Operating system: Oracle Linux
Image type: VMDK
Launch mode: Emulated (required)
Create a new VM instance using the custom image and configure the following settings:
Select the custom image created in the previous step.
Select an image shape (e.g., VM.Standard.E5.Flex) and expand the CPU core count and memory allocation to match the recommended resourcing for the expected flow volume.
Enter a primary VNIC name (required for the Scrutinizer VM).
Manually assign a private IPv4 address to use as the static address for the Scrutinizer appliance (must be entered during appliance setup).
Add public or generated keys for SSH access.
Adjust the boot volume size based on these storage recommendations and keep VPU at the default value.
Save the instance configuration and start/launch the VM.
After obtaining the required details, SSH to the VM as the plixer user to proceed with the initial appliance setup.
Allocating additional storage
If the boot volume size defined when the VM instance was created was greater than 100 GB, make the additional storage available to Scrutinizer as follows:
Important
The steps below should be performed after the initial appliance setup has been completed.
SSH to the Scrutinizer VM as the
plixeruser and elevate to root:su -Run the following and enter
Fixat the prompt that follows:parted -lCreate a new partition:
fdisk /dev/sdaEnter
pto verify the current partitions (sda1,sda2, andsda3).Enter
nfor Command, and then enter4for the partition number; afterwards, press Enter twice to keep the default values.Enter
tfor Command,4to select the partition, and then enter30to enable Linux LVM for the partition.Enter
wto save the changes.
Restart the VM:
rebootReconnect as the
plixeruser, elevate to root, and verify the previous changes:su - fdisk -l
Add the new partition:
vgextend vg_scrut /dev/sda4Allocate the storage (in excess of 100 GB) to the
rootanddblogical volumes as needed (replaceXandYbelow with the desired storage allocations in GB):lvextend -L+XG /dev/vg_scrut/lv_db lvextend -L+YG /dev/vg_scrut/lv_root
Apply the changes:
resize2fs /dev/vg_scrut/lv_db
resize2fs /dev/vg_scrut/lv_root
Verify that the volume sizes have been expanded successfully:
df -h | grep 'lv_'
When done, the additional storage will be available for use by the Scrutinizer VM/server.
Hardware appliance deployment#
Scrutinizer hardware appliances support higher collection rates due to their dedicated resources and are strongly recommended for environments with extremely high flow volumes. They are available through Plixer Technical Support.
After removing the Scrutinizer hardware appliance from its packaging, verify that all accompanying accessories (rackmount kit, appliance-locking bezel and keys, and power cord) are included. The appliance can be mounted in a standard 19-inch rack or cabinet.
Important
If your box arrives torn, dented, or otherwise damaged, the appliance itself seems damaged, or there are missing parts, contact Plixer Technical Support immediately and do not attempt to install the unit.
Hardware setup
Refer to the port labels to identify the ports to be used on the rear panel of the appliance:
iDRAC
Serial
VGA
USB Type-B x 2
10GbE SFP x 2 (1 and 2)
1GbE RJ45 x 2 (3 and 4)
Power supply x 2
Connect the power cable to one of the power supply sockets and plug the other end to a grounded AC outlet or UPS. To take advantage of the redundant PSUs, ensure that each socket is connected to an independent power source.
Depending on the bandwidth requirements of the environment, connect the appliance to the network using either RJ-45 or fiber optic cables. Unused ports may be left uncabled, but connecting both ports of either pair is recommended for high availability.
[Optional] Connect the iDRAC port to a remote access controller using an RJ-45 cable to enable remote console access for hardware management and monitoring. Contact Plixer Technical Support for help with configuring alerts for hardware-related events.
Using the additional ports provided, connect a monitor and keyboard to use during the appliance’s initial setup.
Once the Scrutinizer hardware appliance has been set up and cabled, proceed with the initial appliance setup.
Note
The Ethernet port pairs are configured for adapting load balancing (bonding mode 6).
The iDRAC virtual console can also be used for the appliance’s initial setup.
Basic configuration#
After deploying and starting the appliance, follow the basic configuration steps below to prepare Scrutinizer for use.
Initial setup#
After the Scrutinizer appliance completes its first boot sequence and a user logs in with the credentials plixer:plixer, it will perform a quick preliminary setup before rebooting itself.
After the reboot, log in again to start the initial setup script:
Provide the following information when prompted by the script:
Static IP address
Netmask
Gateway
FQDN
DNS IP address
NTP server IP address
Enter any additional information requested.
At the end of the script, press Enter and wait for the server to reboot again to apply the settings.
After the final appliance reboot, log in to the web interface at the IP address provided with the default admin:admin credentials and proceed to add a license.
Note
The default password for the web interface
adminaccount can be changed from the Admin > Users & Groups > User Accounts page.The default self-signed certificate can be replaced with a CA-signed certificate if desired.
Adding a license#
To add/register a Plixer One or Scrutinizer license key, navigate to Admin > Plixer > Scrutinizer Licensing in the web interface after completing the initial appliance setup process.
A license key can be obtained by contacting Plixer Technical Support and providing them with the Machine ID displayed on the licensing page. The key should then be pasted into the License Key field and saved.
Details for the current license (validity, appliance/server counts, etc.) will be displayed on the page after a key has been added.
Configuring SSL#
SSL support is automatically enabled during the initial setup process for a Scrutinizer server. A self-signed SSL certificate with default values is created at the same time.
This self-signed certificate can later be replaced with a CA-signed certificate if desired.
Note
To learn more about additional certificate-related functions, see this page.
Installing a CA-signed SSL certificate#
As long as the system is set to use the self-signed SSL certificate created during the initial setup process, browsers will return an untrusted certificate warning, which users must override to access the web interface.
To avoid this, an SSL certificate that has been signed by an internal or commercial Certificate Authority (CA) will need to be installed.
Generating a custom certificate signing request (CSR)#
SSH to the primary reporter as the
plixeruser:ssh plixer@PRIMARY_REPORTER_IP[Optional] Create a new directory for the custom CSR, keys, and certificates:
sudo mkdir /home/plixer/CustomCertsThis will provide a static location for storing and managing future certificates.
Create a CSR config/details file:
sudo touch /home/plixer/CustomCerts/csr_config.txtTip
If the details for the CSR do not change from year to year,
csr_config.txtcan be re-used to create a new CSR when the old certificate expires.When generating a new CSR, key, and certificate, including a date in the filename will help identify the correct files in case future changes (e.g., upgrades) overwrite the existing certificate.
Add the details for the CSR to
csr_config.txtin the following format:[req] default_bits=2048 prompt=no default_md=sha256 req_extensions=req_ext distinguished_name=dn [dn] C=US ST=Maine L=Kennebunk O=Plixer, LLC OU=IT emailAddress=support@plixer.com CN=scrutinizer.plxr.local [req_ext] subjectAltName=@alt_names [alt_names] DNS.1=scrutinizer.plxr.local
Note
[alt_names]is now required. To specify multiple Subject Alternative Names (SANs), use one line for each entry, with incrementing DNS numbers (DNS.2=, DNS.3=, etc.).Generate the new CSR and key:
cd /home/plixer/CustomCerts
sudo openssl req -new -sha256 -nodes -out newRequest.csr -newkey rsa:4096 -keyout newCaKey.key -config csr_config.txt
The custom CSR (/home/plixer/CustomCerts/newRequest.csr) can then be sent to any preferred CA for signing.
Installing the signed certificate#
After receiving the CA-signed certificate, follow these steps to install it:
Copy the new certificate to the
/home/plixer/CustomCertsdirectory (or any temporary directory ifCustomCertswas not previously created) on the Scrutinizer server.Backup the current CA certificate and key:
sudo cp /etc/pki/tls/certs/ca.crt /etc/pki/tls/certs/ca.crt.bak
sudo cp /etc/pki/tls/private/ca.key /etc/pki/tls/private/ca.key.bak
Move the new certificate to the correct location:
cp /home/plixer/CustomCerts/CA_CERT_FILENAME.crt /etc/pki/tls/certs/ca.crtMove the new key generated with the CSR to the correct location:
sudo cp /home/plixer/CustomCerts/NEW_KEY_FILENAME.key /etc/pki/tls/private/ca.keyIf the
CustomCertsdirectory was not created/used, the key can be found in the same directory the CSR was generated in.
Restart the nginx service (httpd on pre-v19.7.0 Scrutinizer or pre-v20.0.0 Replicator deployments):
sudo systemctl restart nginx
To verify that the web interface is using the correct SSL certificate, use a browser to navigate to the login page using the FQDN specified in the CA-signed certificate. The browser should no longer return an untrusted certificate warning and the padlock icon in the address bar should be locked instead of open.
Note
The private key may need to be encrypted with the /usr/bin/ask.sh passphrase:
openssl rsa -in server.key -out server.key.new
Non-default CSR configurations#
Certificate signing requests can also be generated with non-default configurations (stronger encryption, no email address, etc.) using the values in the csr_config.txt file in the above instructions.
After the desired configuration has been saved, continue to follow the same instructions to generate the CSR and install the CA-signed certificate.