

Disk management#
Refer to the below guides for details on Scrutinizer’s disk and data management functions.
On this page:
Alerts#
The Scrutinizer Alarm Monitor uses the following Alarm Policies to alert for issues related to disk utilization:
Policy |
Condition |
|---|---|
Diskspace Alert |
Disk utilization for any partition on a Scrutinizer server reaches/exceeds 75% (warning) or 90% (critical) |
Host Index Disk Space Warning |
Host and host pair index databases reach/exceed 75% of the specified Host Index Max Disk Space |
Host Index Disk Space Error |
Host indexing functions are suspended because the Host Index Max Disk Space has been reached |
Host Index Disk Availability Error |
Host indexing functions are suspended because disk utilization for the volume the host and host pair databases are stored on has reached/exceeded 90% |
For more information on host indexing disk utilization, see this section of the Scrutinizer deployment guide.
Tip
Disk utilization for Scrutinizer servers/collectors in a cluster can also be monitored via the Admin > System Health views.
Auto-trimming#
Scrutinizer automatically trims older historical flow data when available disk space falls below a specified threshold.
This threshold is set at 10% by default but can be adjusted by changing the Trimming Limit/Minimum Percent Free Disk Space Before Trimming value under Admin > Settings > Data History > Alarms.
Automatic trimming can also be disabled (not recommended) by unticking the Auto History Trimming checkbox in the same tray. However, flow collection and other functions may be paused when available storage runs low. The amount of storage for the collector can also be increased to retain older records.
Disk cleanup#
The contents of the Scrutinizer filesystem locations below can be manually cleaned up to free up disk space.
Important
Files deleted using the below commands cannot be recovered. Verify that the correct command/path has been entered before running the operation. Backup files that may still be needed should be copied to an external location before they are deleted.
The following locations contain Scrutinizer database files and other data required by the system and should not be included in manual cleanup:
/var/db/big/pgsql/data/var/db/big/host_indexing/host/(default host index database)/var/db/big/host_indexing/host2host/(default host pair index database)/var/db/fast//var/db/cold//var/kafka/(Plixer ML Engine)/var/log/olmigration/
Confirm that log files and/or support bundles are no longer required for troubleshooting before deleting them.
Tip
The ncdu utility (included in Scrutinizer installations) can be used to see how much disk space is currently in use on Scrutinizer’s root (/) and database (/var/db) partitions:
sudo ncdu -x /
sudo ncdu -x /var/db/
Use the arrow keys to navigate between directories, and press q to exit. The utility can also delete files (‘d’ key), but using the commands below is recommended.
Temporary files
Location |
Temporary directories under |
|---|---|
Contents |
Temporary files created by the graphing engine, report exports, and debug output This command is also run automatically at regular intervals. |
Command |
scrut_util --clean tmp
|
Offline upgrade files
Location |
|
|---|---|
Contents |
Offline upgrade packages ( These files should only be deleted if the server is no longer needed as an offline repo host. |
Command |
sudo rm -rf /var/db/big/offline/*
sudo rm -f /home/webapp/html/plixer-repo
|
Full backups (scrut_base_backup.sh)
Location |
|
|---|---|
Contents |
Full backups created using |
Command |
sudo rm -rf /var/db/backup/YYYYMMDD_HHMM
|
Full backups (backup.sh)
Location |
|
|---|---|
Contents |
Full backup files ( |
Command |
sudo rm -f /var/db/big/pgsql/restore/BACKUP_FILENAME
|
Configuration backups
Location |
|
|---|---|
Contents |
Configuration backups created using |
Command |
rm -f /home/plixer/conf.dump
|
Upgrade backups
Location |
|
|---|---|
Contents |
Files saved by the installer during upgrades, including the license key, CA certificate and key, and previous configuration files These files should only be deleted after an upgrade was successfully completed. The license key and CA certificate should also be copied to another location for future use. |
Command |
sudo rm -rf /home/plixer/upgrade_backup_YYYYMMDD
|
Installer files
Location |
|
|---|---|
Contents |
Upgrade installer ( These files should only be deleted after an upgrade was successfully completed. |
Command |
rm -f /home/plixer/scrutinizer-install.run /home/plixer/scrutinizer-install.run.sha256
|
Support bundles
Location |
|
|---|---|
Contents |
Support bundles |
Command |
sudo rm -f /home/plixer/scrutinizer/files/support_*.tar.gz
|
Installation and migration logs
Location |
|
|---|---|
Contents |
Installation and database migration logs (not rotated automatically) |
Command |
sudo rm -f /var/log/Scrutinizer-Install.log /var/log/migrate.log
|
Data retention#
Scrutinizer’s data retention settings can be used to adjust how long Scrutinizer stores aggregated flow data, alarm/event details, and other data, which changes the system’s disk space requirements.
The Admin > Settings > Data History > Flows tray includes a database size calculator, which can be used to see predicted disk space requirements for a specified set of data retention settings.
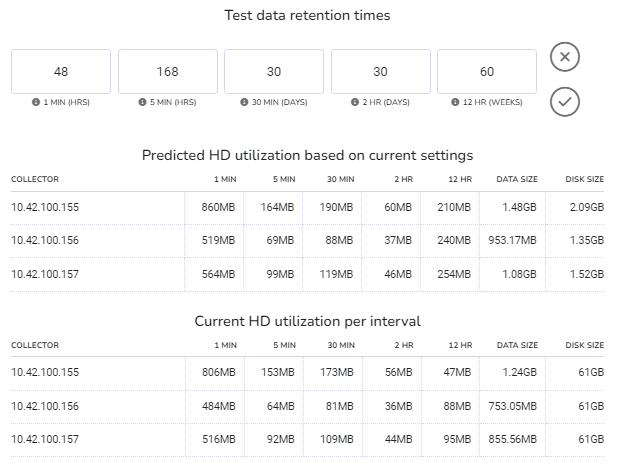
The calculator allows updated data retention settings to be tested and applied (either in the calculator or the tray) before additional disk space is added to a collector (see below).
Click to learn more about Scrutinizer’s disk aggregation method
SAF data aggregation
Scrutinizer’s SAF (Summary and Forensic) data aggregation method is an optimized system of storing flow data that makes use of summary tables to condense collected information without compromising transparency or accuracy.
How SAF works
With SAF, any incoming flow template with the required data elements is aggregated into a new template definition based on a tuple that includes commonPort. The resulting “summarized” template will omit all data elements that prevent aggregation (e.g., source and destination transport ports) but still contain all information required for the vast majority of reporting needs.
Hint
The aggregation logic used to create summary tables can be modified to suit different scenarios. Contact Plixer Technical Support for assistance.
The data elements retained in the summary tables include but are not limited to:
intervalTimecommonPortingressInterfaceegressInterfacesourceIpAddressdestinationIpAddressoctetDeltaCountoctetDeltaCount_revpacketDeltaCountpacketDeltaCount_revflowDirectionapplicationIdprotocolIdentifier
Once five 1m summary tables are available, the data averages for the top 1000 (default) conversations are rolled up into 5m tables, and the system continues the rollups to create 30m, 2h, and 12h tables.
Benefits of SAF aggregation
Because the summary tables created under SAF aggregation are drastically smaller in size than regular full-template tables, they benefit the Scrutinizer system in the following ways:
Reduced disk utilization per table
Increased historical data capacity
Improved report render times
Faster lookups before drilling into forensic data
While only summary data is rolled up into higher interval tables, Scrutinizer still retains the original forensic data, which is used by a handful of reports that require data elements not included in the summary tables. At the same time, the system also maintains a separate totals table for in/out byte counts per interface to allow for accurate utilization reporting without relying on SNMP.
Notes on collecting sFlow
When collecting sFlow, packet samples and interface counters should both be forwarded to the collector. Packet samples will be saved to the raw tables, and interface counters will be saved to the totals tables at one-minute intervals.
Important
Having an sFlow exporter (e.g., switch) that sends multiple templates for different flows may result in overreporting, if the flows contain the same or very similar information. Scrutinizer’s frontend will run reports using data from all templates that match the information. To avoid this, use filters to specify a single template.
Database expansion#
See the corresponding subsection below for instructions to add disk space to a Scrutinizer or Plixer ML Engine appliance.
Scrutinizer#
To add a new disk to a Scrutinizer virtual appliance:
Note
For assistance with expanding storage on a hardware appliance, contact Plixer Technical Support.
Attach the new drive to the Scrutinizer appliance/VM.
Log in to the virtual appliance as the
plixeruser.Launch the interactive utility (scrut_util):
scrut_utilInspect and take note of the current size of the database mounted on
/var/db:show diskspaceIdentify the drive that was added:
show partitionsMake the new drive available to the virtual appliance:
set partitions <NEW_PARTITION>When prompted, select whether or not a backup is available.
Once the operation is complete, confirm that the drive has been added successfully by running show diskspace again and verifying that the new database size includes the drive that was added.
Plixer ML Engine#
To extend a disk volume on a Plixer ML Engine appliance.
Add/attach a new hard disk to the hardware appliance or VM, and then restart the machine.
Navigate to Admin > Resources > ML Engines in the web interface and wait for the engine’s deployment status to switch to Deployed.
Note
The ML Engine can take up to 30 minutes to fully restart when under heavy load. Refresh the ML Engines page every few minutes until the engine is shown as Deployed.
Log in or SSH to the host using the credentials
plixer:plixer.Determine the device name of the new disk (usually
/dev/sdb):lsblkExtend the volume that requires additional disk space:
/home/plixer/ml/tools/mladmin.sh --extend <DEVICE> <VOLUME>Where
DEVICEis the device name of the new disk andVOLUMEis one of the following:root- root partitionsibyl- models partition (/SibylData)db- database partition (/var/db)zookeepers- Kafka ZooKeeper partition (/var/kafka/zookeepers)brokers- Kafka brokers partition (/var/kafka/brokers)
When done, the selected partition will be extended by the full capacity of the newly added disk.
Multi-tier storage#
Scrutinizer can be configured to use additional storage locations to save raw 1-minute data in multi-tiered storage. Once multi-tier storage is enabled, older 1-minute records that need to be accessed less frequently can be automatically moved to a “cold” tier for extended storage.
The Cooling data history setting (under Admin > Settings > Data History > Flows) can be used to configure how long 1-minute data is kept “hot” before being moved to cold storage and eventually deleted at the end of the configured retention period.
Important
Cold storage must be enabled on each collector individually.
Cold storage can be enabled on a Scrutinizer collector as follows:
Prepare (deploy, partition, format, etc.) the storage location to be used.
Mount the location:
Example - Existing NFS v4 share
Install NFS Client Tools:
sudo yum install nfs-utilsAllow NFS traffic through the firewall:
echo "add element inet filter tcp_service_ports { 2049 }" > /etc/nftables-plixer/21-nfs-rules.nft
sudo systemctl reload nftables
Create the mount point:
sudo mkdir -p /var/db/coldAdd the following entry to to
/etc/fstabwith the NFS server’s details (NFS_SERVERandEXPORT_PATH):NFS_SERVER:EXPORT_PATH /var/db/cold nfs4 hard,noatime,nofail,rsize=1048576,wsize=1048576,timeo=60,retrans=2,sec=sys,rw 0 0
Mount the NFS share:
sudo systemctl daemon-reload && sudo mount -a
Example - Disk added in vSphere, partitioned with fdisk and formatted as ext4
Create the mount point:
sudo mkdir -p /var/db/coldGet the device’s UUID:
sudo blkid /dev/sdb1Add an entry to
/etc/fstabin the following format:UUID=DEVICE-UUID-HERE /var/db/cold ext4 defaults 0 2
Mount the device:
sudo systemctl daemon-reload && sudo mount -a
Enable the
coldstorage tier:scrut_util --enable tier --tier cold --verboseNote
In distributed setups, the
enablecommand must be run on both the collector and the cluster’s primary reporter.
After the cold storage tier has been enabled, multi-tier storage options and rules can be configured from the Admin > Settings > Data History > Flows view of the web interface.
Important
If multi-tier storage is disabled (using disable instead of enable) at a later time, new data will no longer be moved to the specified storage tier/device, but data already stored will be retained.